Info#
Auth0 is a popular authentication and authorization platform that provides secure access for applications, devices, and users. It simplifies implementing authentication and authorization in your apps by offering pre-built solutions and integrations.
Auth0 does:
User Authentication: Auth0 supports various authentication methods, including:
- Username and password
- Social logins (like Google, Facebook, GitHub)
- Multi-factor authentication (MFA)
- Passwordless authentication (e.g., via email or SMS)
Authorization: Auth0 helps you manage user roles and permissions, allowing you to restrict access to certain parts of your app.
Single Sign-On (SSO): Users can log in once and gain access to multiple applications, improving the user experience.
Identity Management: It integrates with various identity providers (like OAuth, OpenID Connect, SAML, LDAP) to centralize user management.
Security Features: Includes features like anomaly detection, brute-force protection, and advanced password policies.
APIs and SDKs: Auth0 provides APIs and SDKs for various programming languages and frameworks, making it easy to integrate into your application.
Customizable Login Pages: You can customize the look and feel of the login pages to match your brand.
Auth0 essentially saves developers time by handling complex authentication and security tasks, allowing them to focus on building core features.
Pricing#
There is a Free tier with the following characteristics at the date of this article
- Up to 25,000 monthly active users will have:
- Any type of application
- Password Authentication with Email, Username or Phone Number
- Passkey Authentication
- Social Authentication (Google, Facebook, etc.)
- 5 organizations
- Branded forms (Login, Signup, etc.) and 1 Custom Domain
- Javascript for custom logic during login, signup, etc. (Actions)
- Basic Attack Protection
- Community Support
There is also other tiers with different level of support and features.
Add Login to Your Vue Application#
Ok, lets try to create a VUE application and configure Auth0 with it following the tutorial
You can use the following repo reference for this article https://github.com/rramos/vue-greeter/releases/tag/auth0
Requirements#
- You should have created a Auth0 account
- You should have a sample VUE Project
Auth0 Account#
Follow to https://auth0.com and register for one account.
Next lets creat a new application on the Dashboard. I will call this one Greeter
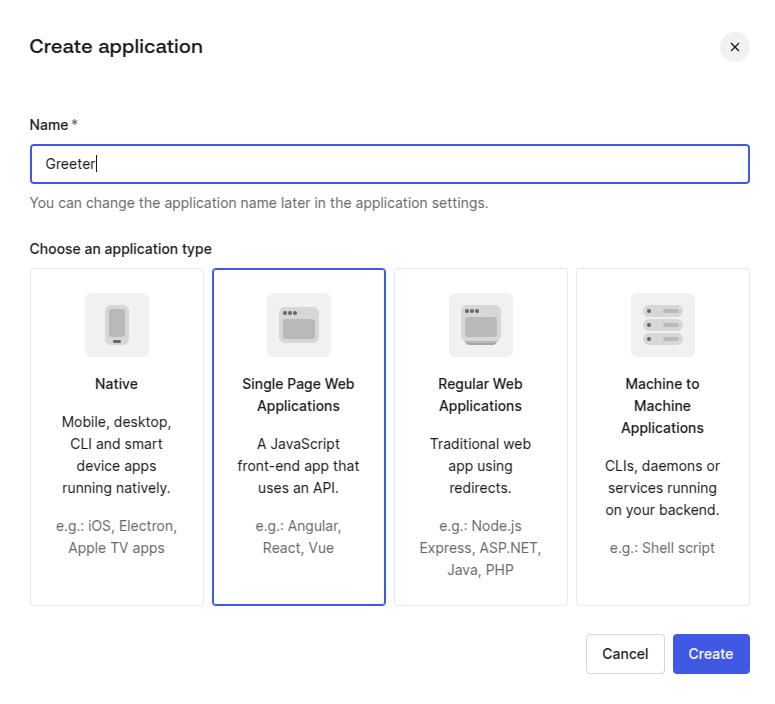
Pick the Technology, in this case we will use VUE.
Get Application keys#
If you go to Settings you should note the following info, it will be required later
- Client ID
- Domain
Register Callback URL#
A callback URL is a URL in your application where Auth0 redirects the user after they have authenticated. The callback URL for your app must be added to the Allowed Callback URLs field in your Application Settings. If this field is not set, users will be unable to log in to the application and will get an error.
Add the following
http://localhost:5173
Register Logout URL#
A logout URL is a URL in your application that Auth0 can return to after the user has been logged out of the authorization server. This is specified in the returnTo query parameter. The logout URL for your app must be added to the Allowed Logout URLs field in your Application Settings. If this field is not set, users will be unable to log out from the application and will get an error.
Add the following
http://localhost:5173
Configure Allowed Web Origins#
You need to add the URL for your app to the Allowed Web Origins field in your Application Settings. If you don’t register your application URL here, the application will be unable to silently refresh the authentication tokens and your users will be logged out the next time they visit the application, or refresh the page.
Add the following
http://localhost:5173
Note: This setup is intended for didactic purposes only. For a production environment, make sure to configure SSL and use a registered domain. Do not use this setup as-is in a production environment.
Now lets move to our sample VUE Project…
Create sample VUE project#
Create initial App#
Lets create a sample vue application (You will need Node.js on your machine).
I will be using bun but you can change for npm.
bun create vue@latest
- I choose the name of the Application Greeter and package name greeter and added ESLint
You should get something like this
┌  Vue.js - The Progressive JavaScript Framework
│
◇  Project name (target directory):
│  Greeter
│
◇  Package name:
│  greeter
│
◇  Select features to include in your project: (↑/↓ to navigate, space to select, a to toggle all, enter to
confirm)
│  ESLint (error prevention)
│
◇  Install Oxlint for faster linting? (experimental)
│  No

Scaffolding project in /home/rramos/Development/local/test-vue/Greeter...
│
└  Done. Now run:

   cd Greeter
   bun install
   bun dev

| Optional: Initialize Git in your project directory with:

   git init && git add -A && git commit -m "initial commit"
Lets build and run to check what this does…
cd Greeter
bun install
bun dev
And there you have it, a nice sample running in http://localhost:5173. There is also a fancy devtools running http://localhost:5173/__devtools__/ Which I need to explore later :D
I will now initialize git and add the changes, As probably this will be messed up
git init && git add -A && git commit -m "initial commit"
Install the Auth0 Vue SDK#
Auth0 provides a Vue SDK to simplify the process of implementing Auth0 authentication and authorization in Vue 3 apps.
Install the Auth0 Vue SDK by running the following commands in your terminal:
bun install @auth0/auth0-vue
Create env file#
Now, remember the previous Domain and ClientId create the file .env.local with the following content
VITE_DOMAIN="<Replace with your Domain>"
VITE_CLIENTID="<Replace with your ClientId>"
And replace the values. Note that for Production you should set a .env.production file.
Edit main.js#
Lets change main.js with following.
import './assets/main.css'

import { createApp } from 'vue'
import App from './App.vue'
import { createAuth0 } from '@auth0/auth0-vue';

const domain = import.meta.env.VITE_DOMAIN;
const clientId = import.meta.env.VITE_CLIENTID;

const app = createApp(App);

app.use(
  createAuth0({
    domain: domain,
    clientId: clientId,
    authorizationParams: {
      redirect_uri: "http://localhost:5173/"
    }
  })
);

app.mount('#app');
App.vue#
Edit the file ./src/App.vue and include the following imports
import TheLogin from './components/TheLogin.vue'
import TheLogout from './components/TheLogout.vue'
import Profile from './components/Profile.vue'
And change your main block so that the new components be included
...
  <main>
    <TheLogin />
    <TheLogout />
    <Profile />
    <TheWelcome />
  </main>
...
Now lets create the components
TheLogin.vue#
Create the following Component in ./components/TheLogin.vue with the content
<template>
    <div v-if="isAuthenticated"></div>
    <div v-else>
        <div class="login">
            <button @click="login">Log in</button>
        </div>
    </div>
</template>
<script>
    import { useAuth0 } from '@auth0/auth0-vue';

    export default {
      setup() {
        const { loginWithRedirect,user,isAuthenticated } = useAuth0();

        return {
          login: () => {
            loginWithRedirect();
          },
          user,
          isAuthenticated
        };
      }
    };
</script>

<style scoped>
  .login {
    place-items: center;
    padding-right: calc(var(--section-gap) / 2);
    border: 1px solid var(--color-border);
    background: var(--color-background);
    border-radius: 8px;
    height: 50px;
  }

  .login button {
    background-color: hsla(160, 100%, 37%, 1);
    text-decoration: none;
    border: none;
    padding: 15px 32px;
    text-align: center;
    font-size: 16px;
    cursor: pointer;
    font-weight: bold;
  }

  .login:hover {
    background: rgba(84, 84, 84, 0.65);
  }
</style>
TheLogout.vue#
Create the following Component in ./components/TheLogout.vue with the content
<template>
    <div v-if="isAuthenticated">
      <div class="logout">
        <button @click="logout">Log out</button>
      </div>
    </div>
</template>

<script>
  import { useAuth0 } from '@auth0/auth0-vue';

  export default {
    setup() {
      const { logout, user, isAuthenticated } = useAuth0();

      return {
        logout: () => {
          logout({ logoutParams: { returnTo: window.location.origin } });
        },
        user,
        isAuthenticated
      };
    }
  };
</script>

<style scoped>
  .logout {
    place-items: center;
    padding-right: calc(var(--section-gap) / 2);
    border: 1px solid var(--color-border);
    background: var(--color-background);
    border-radius: 8px;
    height: 50px;
  }

  .logout button {
    background-color: hsla(160, 100%, 37%, 1);
    text-decoration: none;
    border: none;
    padding: 15px 32px;
    text-align: center;
    font-size: 16px;
    cursor: pointer;
    font-weight: bold;
  }

  .logout:hover {
    background: rgba(84, 84, 84, 0.65);
  }
</style>
Profile.vue#
Create the following Component in ./components/Profile.vue with the content
<template>
    <div v-if="isAuthenticated">
      <div>
        <h2>User Profile: {{ user.name }}</h2>
        <code>{{ user.email }}</code>
      </div>
    </div>
</template>

<script>
    import { useAuth0 } from '@auth0/auth0-vue';

    export default {
      setup() {
        const { loginWithRedirect, user, isAuthenticated } = useAuth0();

        return {
          login: () => {
            loginWithRedirect();
          },
          user,
          isAuthenticated
        };
      }
    };
</script>
Summary#
- We just created 3 Components in view
1.1 The components use the rendering conditional
v-ifandv-elsedepending on the authentication status 1.2 isAuthenticated is obtain from useAuth0 - User Profile data is contained in
uservariable in this case only need the user.name and user.email but there are more available - Applied some style to match the sample application
- included the 3 new components on the main Vue application
You can restart the with bun and SSO on your application now.
Conclusion#
In this article, we follow Auth0’s tutorial to set up a Vue sample application. The configuration process is straightforward and simple. Although this article doesn’t cover the extensive customization options available on the Auth0 Dashboard, it’s worth exploring them further.
I also plan to experiment with other frameworks and conduct tests with JWT and GoLang, but that will be covered in a separate article. Overall, this solution appears to be a great fit for startups looking to accelerate their authentication component, with the reassurance that it can scale to an enterprise level as the business grows. I was particularly impressed by the wide range of supported tech stacks.
References#
- https://auth0.com/docs/quickstarts
- https://auth0.com/pricing
- https://auth0.com/docs/quickstart/spa/vuejs/interactive
- https://auth0.com/docs/quickstart/webapp/golang/interactive
- https://auth0.com/docs/quickstart/spa/react/interactive
- https://developer.auth0.com/resources/guides/spa/vue/basic-authentication
- https://github.com/auth0-samples/auth0-vue-samples/tree/master/01-Login
- https://vuejs.org/guide/quick-start.html
- https://auth0.com/learn